▼
Monday, 15 July 2013
T shirt printing at Brownies
We have been working towards our Artist badge at Brownies. So far we have made textured collage flags, decorated bookmarks and painted watercolour pictures of wild flowers. This week we finished our stamped and decorated t-shirts.
We made our own stamps a couple of weeks ago using 3" squares of cardboard (with two squares stuck together for extra strength), tacky PVA glue and some wool. We had intended to make them with string, but our string wasn't suitable as it was a nylon one which wouldn't bend and so we grabbed the wool out of our cupboard left over from our pompom making session. We hadn't tried this out before and we just hoped that it would work! The great news is that it did work - brilliantly! The stamps did need to be left to dry completely, so it worked well that we made the stamps in an earlier session.
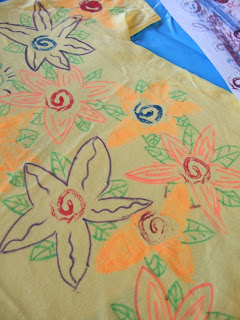
This week we gave out the finished stamps and some yellow t-shirts (as we ask the girls to have yellow t-shirts when we go on Brownie holiday). We placed some old magazine pages inside the t-shirts to stop the paint soaking through.We handed out palettes with red, yellow and blue fabric paint and encouraged the girls to mix their own colours too. The paint was brushed onto the wool before being stamped onto the t-shirts.
We had some two tone stamping too...
Here are some of the finished t-shirts designs. We embellished the stamping with fabric felt tip pens.
These stamps worked so well. I was a little nervous of the designs which used only one strand of wool, but these actually seemed to work the best. The girls are all really pleased with their t-shirts.


Great blog. I like layout!!!!
ReplyDeletethanks for sharing unique tricks.
unique t shirts.
I like your all the design and the strategy by which you are creating these all the designs. Keep sharing like this. t-shirt printing
ReplyDeleteWhat an immense read, post more often please! Is there any further reading you would recommend on this?
ReplyDeleteAmela
T-shirt printing Bedford